To 3D print, you need a 3D file, slicing software (a slicer) and a printer. The slicer cuts the file into layers, and the machine lays those layers down one by one. If you don't own a printer, you can send the same file to an online 3D printing service, which shows you the price, prints the part and hands it over. You can also go to a fablab, which lends you its machines once you've completed a training session.
A small part costs less than most people expect. In Paris, the Press3D workshop publishes its prices down to the cent: a PETG repair part measuring 60 × 40 × 15 mm takes 1 hr 32 min of machine time and costs €13.24 including VAT, with pickup included.
How to 3D print in 5 steps
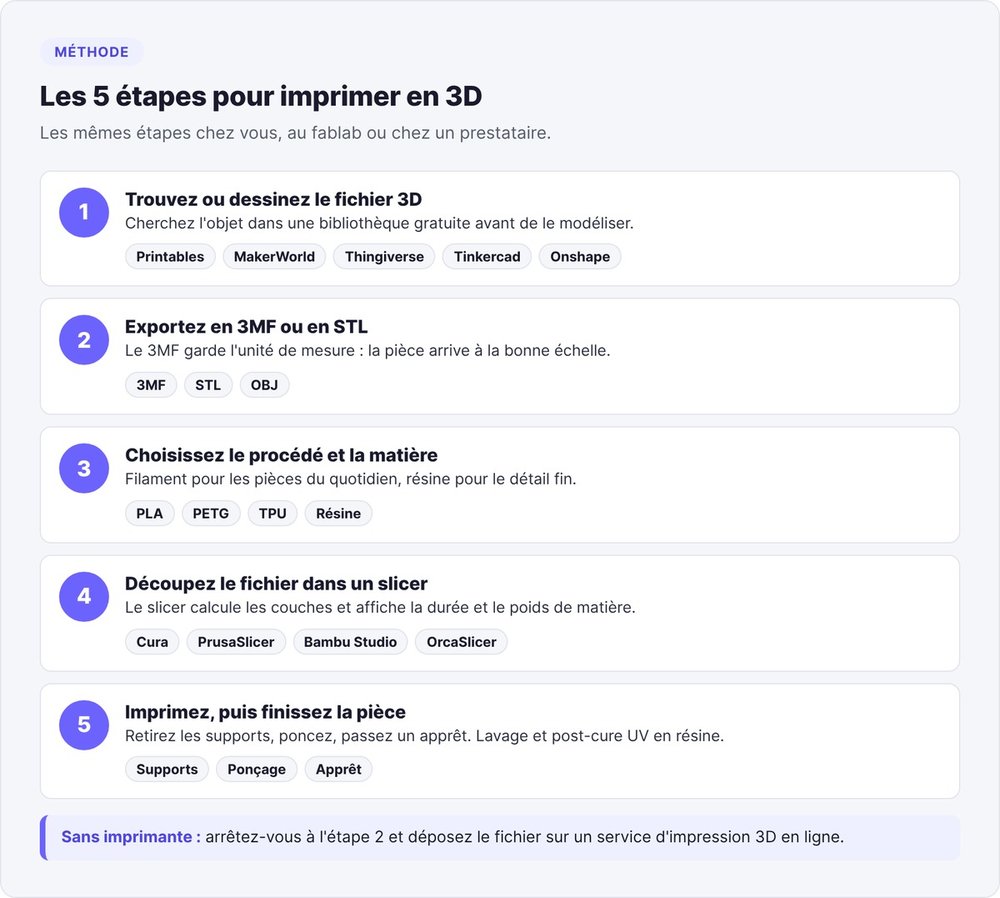
The five steps are the same whether you print at home, at a fablab or through a service provider.
1. Find or design the 3D file
Search for your object before you design it. Printables (Prusa), MakerWorld (Bambu Lab) and Thingiverse host hundreds of thousands of free models: phone stands, enclosures, spare parts, figurines.
Otherwise, design it yourself. Tinkercad runs in the browser and handles parts built from simple shapes. Onshape and Fusion cover dimensioned technical parts, with a free tier for personal use. Blender is the tool for organic shapes like a figurine.
For an object that already exists, photogrammetry rebuilds a model from dozens of photos taken all around it. For a mechanical part, measuring it with calipers and then modeling it in Tinkercad or Onshape gives a more accurate result.
2. Export to STL or 3MF
Printers and services read mesh files: STL, 3MF and OBJ. Choose 3MF when your software offers it, because it stores the unit of measurement. A part designed in centimeters and exported as STL sometimes lands in the slicer ten times too small. Native CAD files, such as STEP or a SolidWorks file, need to be exported to one of these three formats first.
3. Choose the process and the material
Fused filament handles most everyday parts, and resin handles fine detail.
4. Slice the file
The slicer calculates the layers and the nozzle path, then exports a G-code file for the printer to run. UltiMaker Cura, PrusaSlicer, Bambu Studio and OrcaSlicer are all free. They also show print time and material weight, two figures that are useful even if you don't own a printer.
5. Print, then finish the part
Plan on one to four hours of machine time for a small PLA part, and overnight for a 20 cm object. Once the part is off the bed, remove the supports, sand down the marks, then apply a primer if you plan to paint it. A resin part also needs a wash bath and a UV post-cure.
Filament or resin: the three processes to know
Three processes cover most of 3D printing.
Fused filament (FDM)
The machine melts a plastic filament and deposits it layer by layer, like a very precise glue gun. It's the cheapest process, and it suits functional parts, enclosures, jigs and large parts. Layers stay visible to the naked eye, especially on curves.
Resin (SLA, MSLA)
A laser or an LCD screen hardens liquid resin, curing an entire layer at once on MSLA machines. Detail goes down to 50 microns, and surfaces come out smooth. Resin is used for figurines, jewelry and scale models. Parts are more brittle than filament, and liquid resin requires gloves and a well-ventilated room.
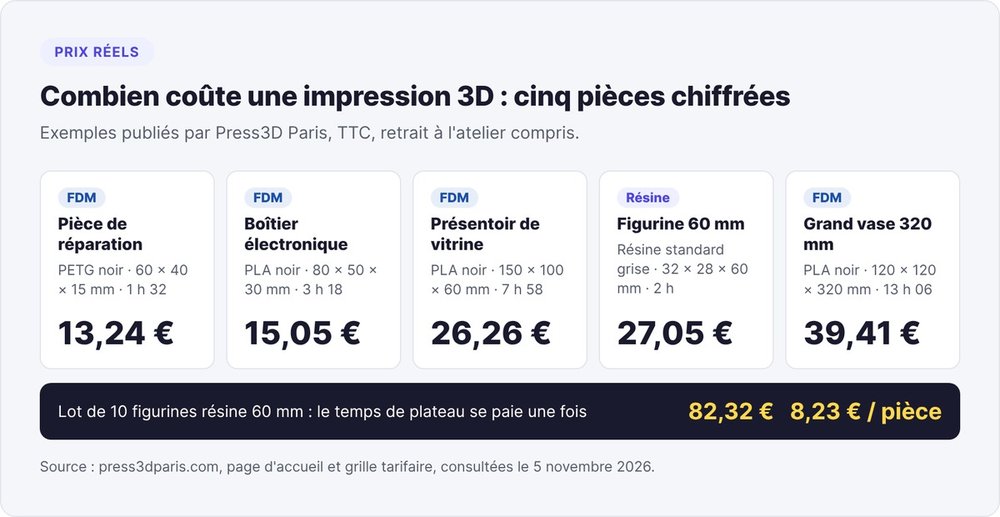
This exposure method affects the price. Since the machine exposes the whole layer in one go, ten figurines of the same height take as long as a single one. Press3D therefore prices resin by part volume plus build-plate time of €0.06 per millimeter of height, charged once per order line. A 60 mm figurine costs €27.05 on its own, while a batch of ten comes to €82.32, or €8.23 per figurine.
Powder (SLS) and metal, available through services only
Selective laser sintering (SLS) fuses nylon powder layer by layer without supports, because the unfused powder holds the part in place. Metal printing (DMLS, SLM) works on the same principle with steel, aluminum or titanium powders. These machines cost tens of thousands of euros, so you access them through an online platform.
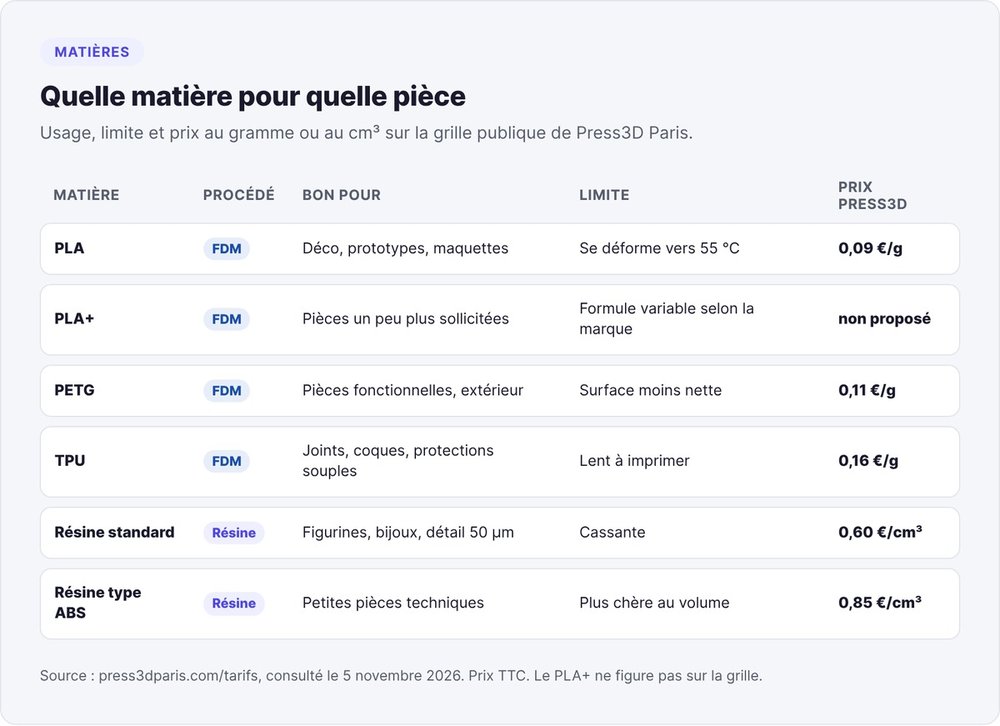
Which material for which part
- PLA: the default material, easy to print, for decor, prototypes and models. It deforms above roughly 55 °C, so keep it out of a car in midsummer.
- PLA+: a modified PLA, slightly less brittle. The formula changes from one brand to another.
- PETG: more resistant to heat and impact, suited to functional and outdoor parts. Its surface finish is slightly less crisp.
- TPU: a flexible filament for gaskets, cases and protective parts. It prints slowly.
- Standard resin: fine detail for figurines and jewelry, at the cost of a brittle part.
- ABS-like resin: a tougher resin for small technical parts.
The four slicer settings that matter
A slicer offers hundreds of parameters. Four of them determine a part's strength, appearance and print time.
Layer height, infill, supports, orientation
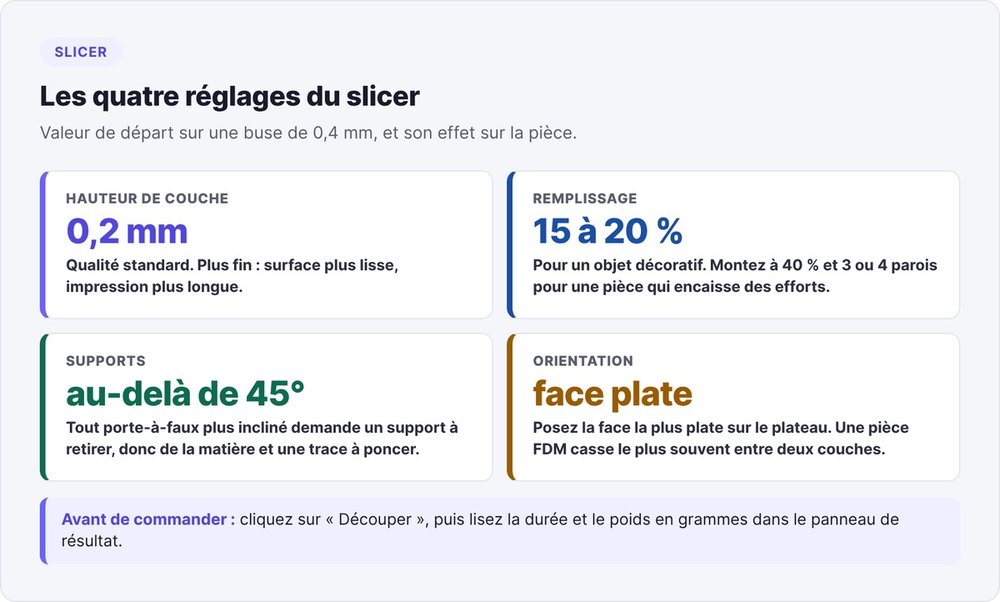
- Layer height. 0.2 mm gives standard quality on a 0.4 mm nozzle. Go lower and the surface gets finer while the print takes longer.
- Infill. The inside of an FDM part is a grid. 15 to 20% is enough for a decorative object. A part that takes loads goes up to 40% or more, with three or four walls.
- Supports. Any overhang beyond roughly 45° needs a temporary support, which you remove after printing.
- Orientation. Place the flattest face against the build plate. You'll need fewer supports and the part will adhere better. A part that has to withstand force should be oriented so the force runs along the layers, because an FDM part usually breaks between two layers.
Check weight and time before printing or ordering
Open the file in a free slicer, choose the material, then click "Slice". The results panel shows the estimated time and the filament weight in grams, which is enough to estimate the price at any provider that publishes its rates.
Take an enclosure using 40 g of PLA and 3 hours of machine time, priced with Press3D's rates: €1.50 for setup, 40 g × €0.09 = €3.60 for material, 3 hrs × €1.30 = €3.90 for machine time, for a total of €9.00, plus a €2.40 order fee. On a part weighing a few dozen grams, print time weighs more on the bill than material.
3D printing without a printer: four options
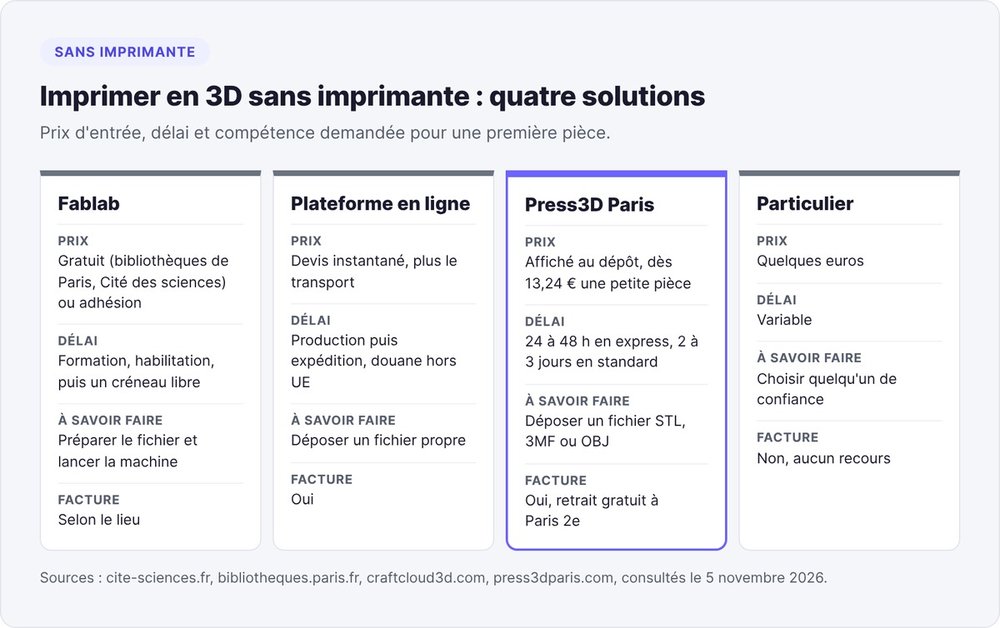
Without a machine of your own, you have four ways to get a printed part.
The fablab
A fablab lends you its machines, provided you learn how to use them. In Paris, four spaces are open to the public:
- The Fab Lab at the Cité des sciences, in the Carrefour numérique² (19th arrondissement). Start with the free "FDM 3D printing" training at the Cité des sciences Fab Lab, which lasts an hour and a half, then get certified, and finally book a slot on a machine. The Fab Lab provides the PLA.
- The City of Paris library fablabs. The Marguerite Duras media library welcomes the public from age 12, free of charge, in its fablab, the Bibliofab, with introductory sessions by appointment and open-access time. The Robert Sabatier library runs open days every Saturday in its Sablab, with a 3D printer available for free. The City keeps its list of library fablabs up to date.
- Villette Makerz, in the Parc de la Villette (19th arrondissement), offers 3D printing training and rents its machines to makers and businesses.
- Electrolab, in Nanterre, is one of Europe's largest hackerspaces, with 1,500 m² of machines, including a 3D printing area, open to members of the association.
A fablab is a good fit for learning the machine and iterating on several versions of a model. If you need a part this week, factor in the time for a training session, certification and an open slot.
Online 3D printing platforms
Online 3D printing platforms show a quote as soon as you upload your file, then produce and ship the part.
- Sculpteo prints in France, in Villejuif, with more than 30 materials, from one-off parts to industrial runs, and covers powder sintering and metal.
- Craftcloud, the comparison service from All3DP magazine, puts more than 150 professional printing services worldwide in competition and ranks their offers by price and lead time. Craftcloud doesn't print anything itself.
- JLC3DP, the 3D printing arm of JLCPCB, advertises low starting prices from its factory in China. Add international shipping and customs fees.
- 3DEXPERIENCE Make, Dassault Systèmes' marketplace, puts industrial providers in Europe and North America in competition.
Choose a platform in three cases: a run of several hundred parts, a specialized process like metal, or a certified material for a regulated use. On a single part, shipping costs more than the printing.
Press3D Paris: order online and pick up your part in Paris
If you live or work in the Paris region, Press3D Paris combines the online upload of a platform with the turnaround of a neighborhood workshop. We built this service at swanbase, and the workshop prints in the 2nd arrondissement of Paris.
- Instant pricing. Upload an STL, 3MF or OBJ file up to 150 MB, or several files for a batch. The price and pickup date appear within seconds, with no quote to request, and you pay the amount shown.
- Three turnaround options. Express in 24 to 48 hours (+45%), standard in 2 to 3 days, grouped economy in 5 to 7 days (−15%).
- Four machines. Two resin printers with 50-micron detail on a 192 × 120 × 200 mm build plate, and two filament printers, including a delta that reaches 360 mm in height. Filament options include PLA, PETG, flexible TPU and multicolor printing.
- Live tracking. The site shows your position in the queue and your part's progress layer by layer.
- Free pickup. Collect the part at the workshop, or have it delivered to a pickup point (€4.90 excl. VAT), to your door (€6.90 excl. VAT) or by same-day courier within Paris (€14.90 excl. VAT).
Press3D publishes its full price list. For filament, a part costs €1.50 for setup, plus material by the gram and €1.30 per hour of machine time at standard quality. Quantity discounts start at 3 identical parts (−5%) and go up to −20% from 26 parts. Before your first upload, read the guide to preparing an STL file: it explains the automatic checks run on every file.
Private individuals
On Leboncoin, Facebook groups and maker forums, individuals will print a part for a few euros. For a simple, non-critical object, this arrangement works fine. However, you get no invoice, no recourse if the part breaks and no commitment on the confidentiality of your file, and a business can't expense the purchase.
How much does 3D printing cost
A small filament part printed by a service costs between €10 and €20. The price climbs with print time much faster than with material.
Setup, material by the gram, machine hours
A provider charges for three things. Setup covers checking the file, starting the print and removing the part. Material is billed by the gram for filament and by the cm³ for resin. Machine time is billed by the hour for filament and by height for resin. On top of that come order fees, and shipping if you don't pick up the part.
On Reddit, one user asked whether €40 for a case was an outrageous price. On a public price list, that amount corresponds to roughly 13 hours of machine time, the equivalent of a large 32 cm vase.
Five parts priced to the cent
Press3D publishes these examples on its homepage, calculated with its current rates, including VAT and workshop pickup:
| Part | Material | Dimensions | Machine time | Price incl. VAT |
|---|---|---|---|---|
| Repair part | Black PETG | 60 × 40 × 15 mm | 1 hr 32 min | €13.24 |
| Electronics enclosure | Black PLA | 80 × 50 × 30 mm | 3 hrs 18 min | €15.05 |
| Display stand | Black PLA | 150 × 100 × 60 mm | 7 hrs 58 min | €26.26 |
| 60 mm figurine | Gray standard resin | 32 × 28 × 60 mm | 2 hrs | €27.05 |
| Large vase | Black PLA | 120 × 120 × 320 mm | 13 hrs 06 min | €39.41 |
The vase takes up 128 times the volume of the repair part and costs three times as much. Setup and order fees weigh heavily on small parts, which is why grouping several parts into one order pays off.
Lowering the bill
- Reduce the infill of a decorative part to 15%, and orient it to eliminate supports.
- Group your parts. In resin, ten parts of the same height share the same build-plate time. In filament, quantity discounts kick in from three identical parts.
- Pick the economy turnaround when the part isn't urgent: −15% at Press3D.
- Hollow out large resin volumes. A hollow figurine with drain holes uses far less resin.
Ordering a 3D print online, step by step
On Reddit, people ordering their first 3D printed part keep asking the same question: "I don't know what to ask them for." Here are the files to prepare, the details to specify and the checks to run at pickup.
The files to send
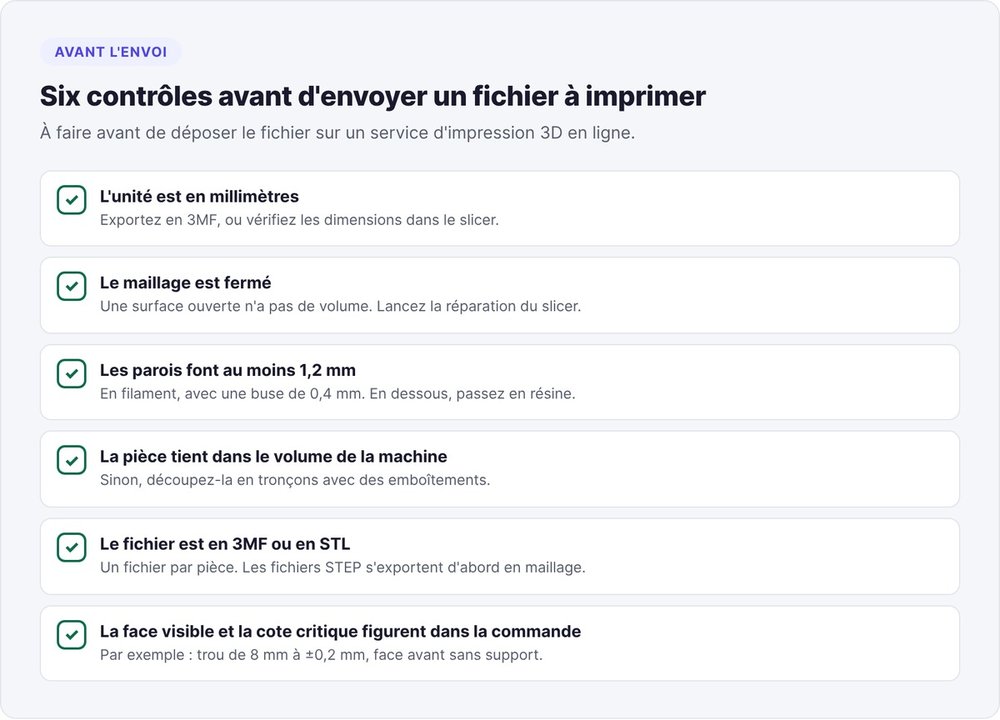
Send one file per part, preferably in 3MF, otherwise in STL or OBJ. Check three things before uploading: the unit (millimeters), a closed mesh, and dimensions that fit within the machine's build volume.
The details to specify
- Material and color, based on use: PLA for a decorative object, PETG for a part exposed to heat or the outdoors, resin for fine detail.
- Quantity, to take advantage of batch discounts.
- The visible face, if one side of the part matters: the provider will orient it so the support marks end up elsewhere.
- The critical dimension, if the part has to fit into another: state the dimension and the acceptable tolerance, for example an 8 mm hole at ±0.2 mm.
- Turnaround, keeping express (+45% at Press3D) for urgent parts.
Checks at pickup
At pickup, measure the critical dimension with calipers, inspect the visible face and test the fit. A resin part should feel dry to the touch, with no sticky film. Report any defect on the spot, with the part in front of you.
Buy a 3D printer or use a service
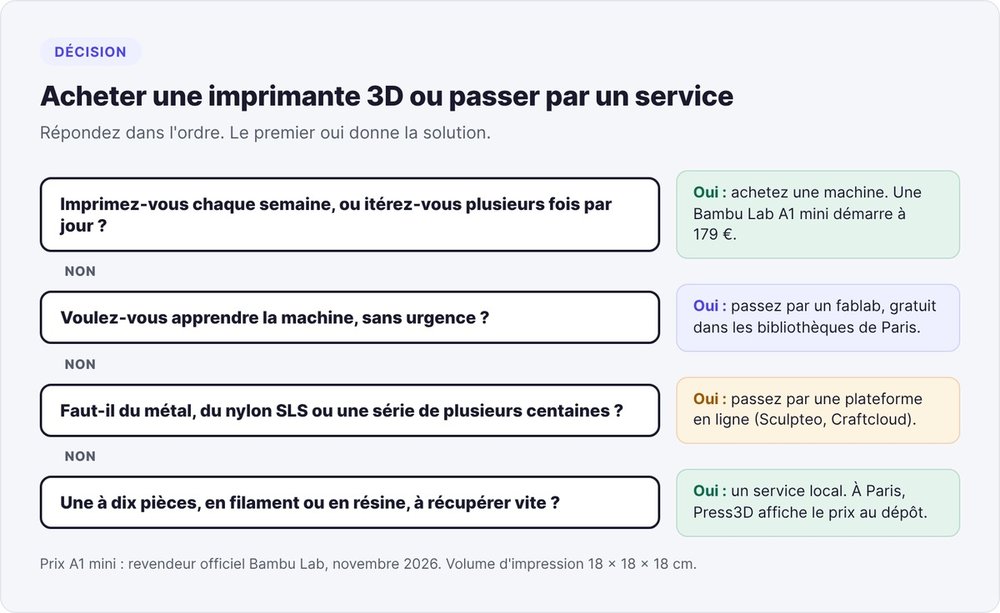
The Bambu Lab A1 mini, a filament machine with an 18 × 18 × 18 cm build volume, sells from €179 at official retailers. That price doesn't include the learning curve or failed prints.
Buy a machine if you print every week, if you iterate on the same model several times a day, or if 3D printing interests you in its own right. Use a service for one to ten parts a year, for resin when your machine only does filament, or for a part bigger than your build plate. At €13 to €40 per part, the price of an A1 mini equals 5 to 13 ordered parts, before counting the filament spool or the hours spent tuning.
Printing a prototype when you're launching a startup
For a hardware startup, 3D printing shortens the loop between the drawing and the part in your hand. You can test an enclosure shell, a sensor mount or an appearance model in two or three days, while an injection mold takes weeks and several thousand euros.
Pick the process based on what you're testing. Resin works for an appearance model to show a customer or bring to a trade show. PETG works for a functional part you'll screw, clip and drop on the floor.
If your prototype includes electronics, our guide to building your first robot from salvaged parts shows how to drive motors with an ESP32 board, and the €15 printed enclosure from the table above holds it easily.
Physical AI startups prototype their grippers, camera mounts and covers the same way. And if your product's software still needs writing, vibe coding for non-technical founders covers the code side of the MVP.
At each iteration, print the cheapest version that answers your question. A €15 PLA test shell tells you whether the boards fit. Save the resin version for the customer meeting.
The four most common printing mistakes
- Forgetting the unit. A model designed in centimeters and exported without a unit arrives ten times too small. Export to 3MF, or check the dimensions in the slicer before printing.
- An open mesh. A surface that isn't closed has no volume, and the slicer slices it badly. Scans often produce this defect. Your slicer's repair function fixes most cases.
- Walls that are too thin. Below 1.2 mm thick, a filament part becomes brittle with a 0.4 mm nozzle. Thicken the wall, or switch the part to resin.
- A part that exceeds the build volume. A part larger than the build plate has to be printed in several sections and glued together. Design the joints in from the modeling stage.
FAQ
How do you 3D print without a printer?
Upload your STL, 3MF or OBJ file to an online 3D printing service. The service shows the price, prints the part, then ships it to you or hands it over at the workshop. In Paris, Press3D Paris shows the price and pickup date as soon as you upload, with free pickup in the 2nd arrondissement. A fablab is the other option: it lends its machines after a training session and certification.
Where can I get something 3D printed in Paris?
For fast pickup, Press3D Paris prints in the 2nd arrondissement. To print it yourself, try the Fab Lab at the Cité des sciences (19th), Villette Makerz, or the free fablabs in the City's libraries, such as the Bibliofab at the Marguerite Duras media library. Sculpteo prints in Villejuif for industrial processes.
Can you 3D print for free?
Yes, at some public fablabs. In Paris, the library fablabs are free. The Fab Lab at the Cité des sciences provides PLA after a free training session. Online services charge a fee: expect €10 to €20 for a small filament part.
How do you 3D print from a photo?
A single photo isn't enough: you first need a 3D model. For a real object, photogrammetry rebuilds the model from dozens of photos taken all around it. For a logo or a drawing, Tinkercad imports the image as an SVG and gives it thickness.
What file do you need for 3D printing?
A mesh file: STL, 3MF or OBJ. 3MF is the best choice, because it stores the unit of measurement and prevents scaling errors. CAD files like STEP need to be exported to one of these formats first.
PLA or PLA+: what's the difference?
PLA+ is a PLA modified by the manufacturer to make it less brittle and slightly more impact-resistant. The formula varies from brand to brand, with no common standard. PLA is enough for a decorative part, and for a part exposed to heat, switch to PETG.
Can you 3D print in multiple colors?
Yes, with filament, using a printer that switches spools during the print, such as a Bambu Lab fitted with an AMS unit. On a single-nozzle machine, you can also change filament at a set height, for example to make raised text in a different color.