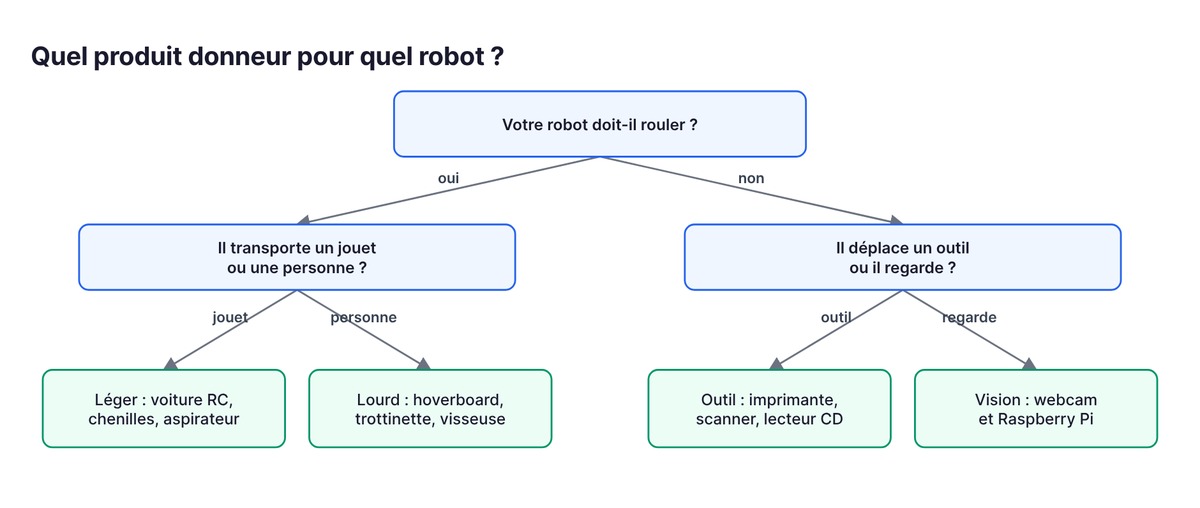
To build your first robot without buying a kit, start with a device that already rolls or moves: a remote-control car, a broken robot vacuum, an old printer. You keep its motors, wheels and sensors, pull out its circuit board, and wire in an ESP32 board and a motor driver instead. The rest happens in code. At Gotronic, on September 18, 2026, a NodeMCU ESP32 board costs €13.90 incl. VAT and a TB6612FNG dual motor driver costs €6.60 incl. VAT. The electronics you need to buy come to €20.50, and the donor product supplies the mechanics, which is the most time-consuming part to design.
A Roomba from the 500 and 600 series goes even further: iRobot documents its serial port, so you can control it without opening the shell. This guide covers the four building blocks of a robot, twelve donor products and their parts, a step-by-step first project, and the pitfalls of salvaging.
The 4 building blocks of a robot
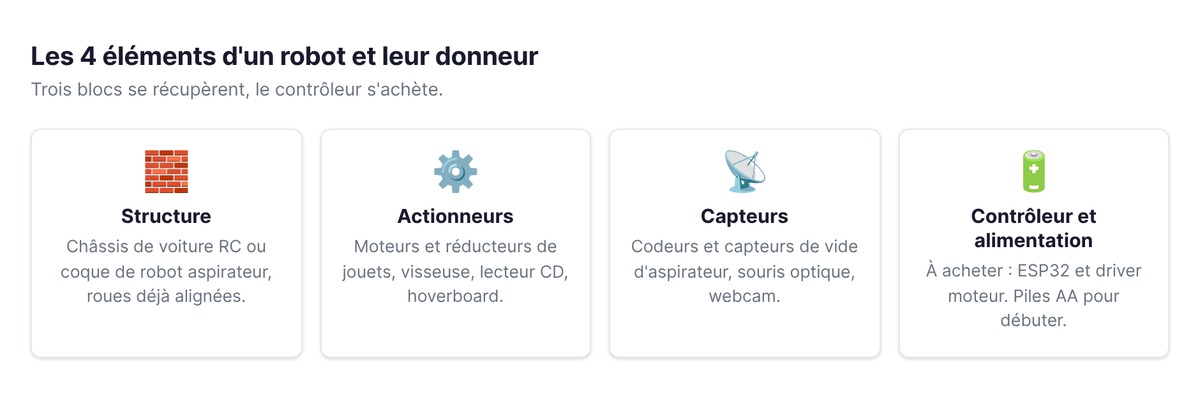
Every robot, from a toy to an industrial arm, combines four blocks: a structure, actuators, sensors, and a controller with its power supply. When you open up a device, these four blocks are what you are looking for.
Structure and chassis
The structure carries everything else and sets the geometry: wheel spacing, center of gravity, axle alignment. On a wheeled robot, two misaligned wheels make it drift off course. The chassis of an RC car or a vacuum solves this from the start, because a manufacturer designed and molded it.
Actuators: motors, gearboxes, servos
Actuators create movement. A DC motor spins fast with little force, and the gearbox trades that speed for torque. A servo adds a position sensor and targets a specific angle. A stepper motor advances in precise, regular steps, which makes it ideal for moving a carriage along an axis. Everyday appliances contain all three, already mounted.
Sensors
Sensors tell the robot about itself and its surroundings: wheel encoders to count rotations, contact switches, infrared distance sensors, cameras. Without sensors, you have a remote-controlled machine. With an obstacle sensor, the robot decides on its own when to stop.
Controller and power
The controller, a microcontroller, reads the sensors and drives the motors. The power supply delivers two voltages: 3.3 V or 5 V for the logic, and another for the motors. If both share the same wire without precautions, the board reboots every time a motor starts, a classic first-robot failure.
Building your first robot from a donor product
A donor product is a consumer device, secondhand or broken, that you open up for its parts. Building your first robot this way flips the usual order: you start from mechanics that already work, then replace the brain.
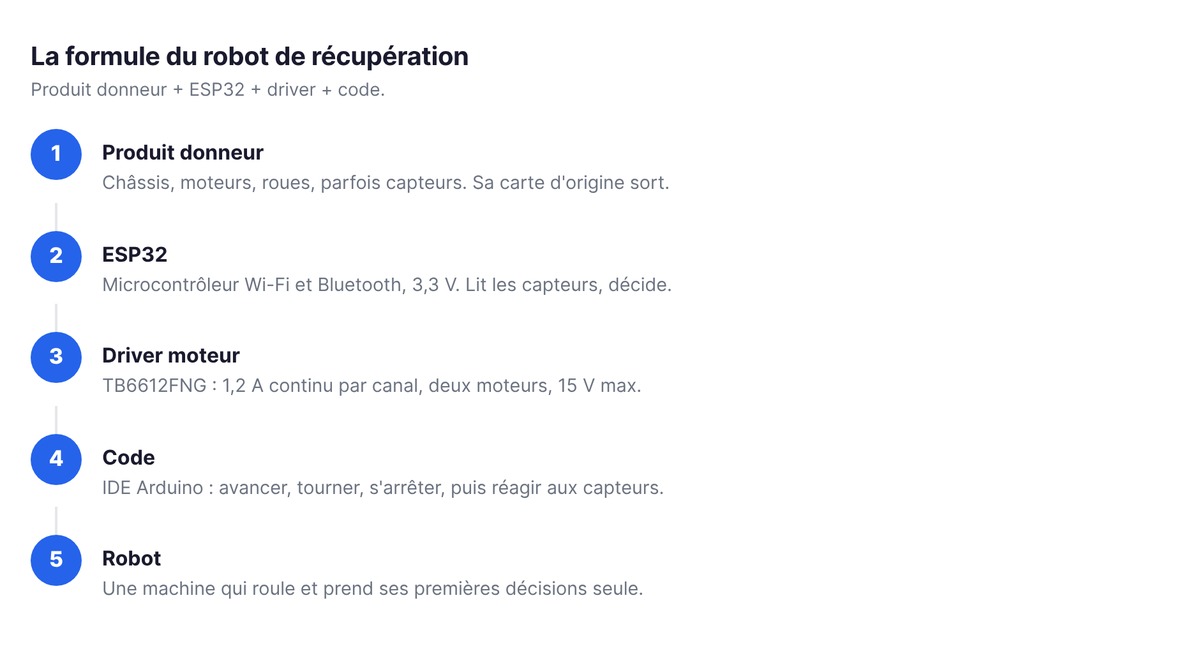
The formula: donor product + ESP32 + driver + code
From the donor product you take the chassis, the motors, the wheels and sometimes the sensors. The ESP32 replaces the original board: according to the manufacturer's datasheet, this Espressif microcontroller has 802.11 b/g/n Wi-Fi, Bluetooth 4.2, one or two Xtensa LX6 cores up to 240 MHz, and up to 34 GPIO pins at 3.3 V. The motor driver supplies the power, since a microcontroller pin cannot deliver the current a motor needs. The code connects the sensors to the motors.
Parts per euro: why a toy beats a basket of components
Components bought individually arrive loose: you still have to drill, line the motors up on a common axis, and find wheels that fit the shaft. An RC car comes with all of that sorted, plus a battery compartment and often steering. A robot vacuum adds suspended wheels, encoders and a ring of sensors. Buy new only what salvage cannot reliably provide: the microcontroller, the driver, the wires.
Buying broken: pick the right fault
A broken device costs less, and some faults don't matter for a robot: a fried board, an app the manufacturer abandoned, a lost charger, a dead battery. You would replace all of those anyway. A broken wheel, a slipping gearbox or a cracked chassis, on the other hand, rob you of exactly the parts you came for. Ask the seller whether the motors still turn, or test them yourself with a battery.
12 donor products and their parts
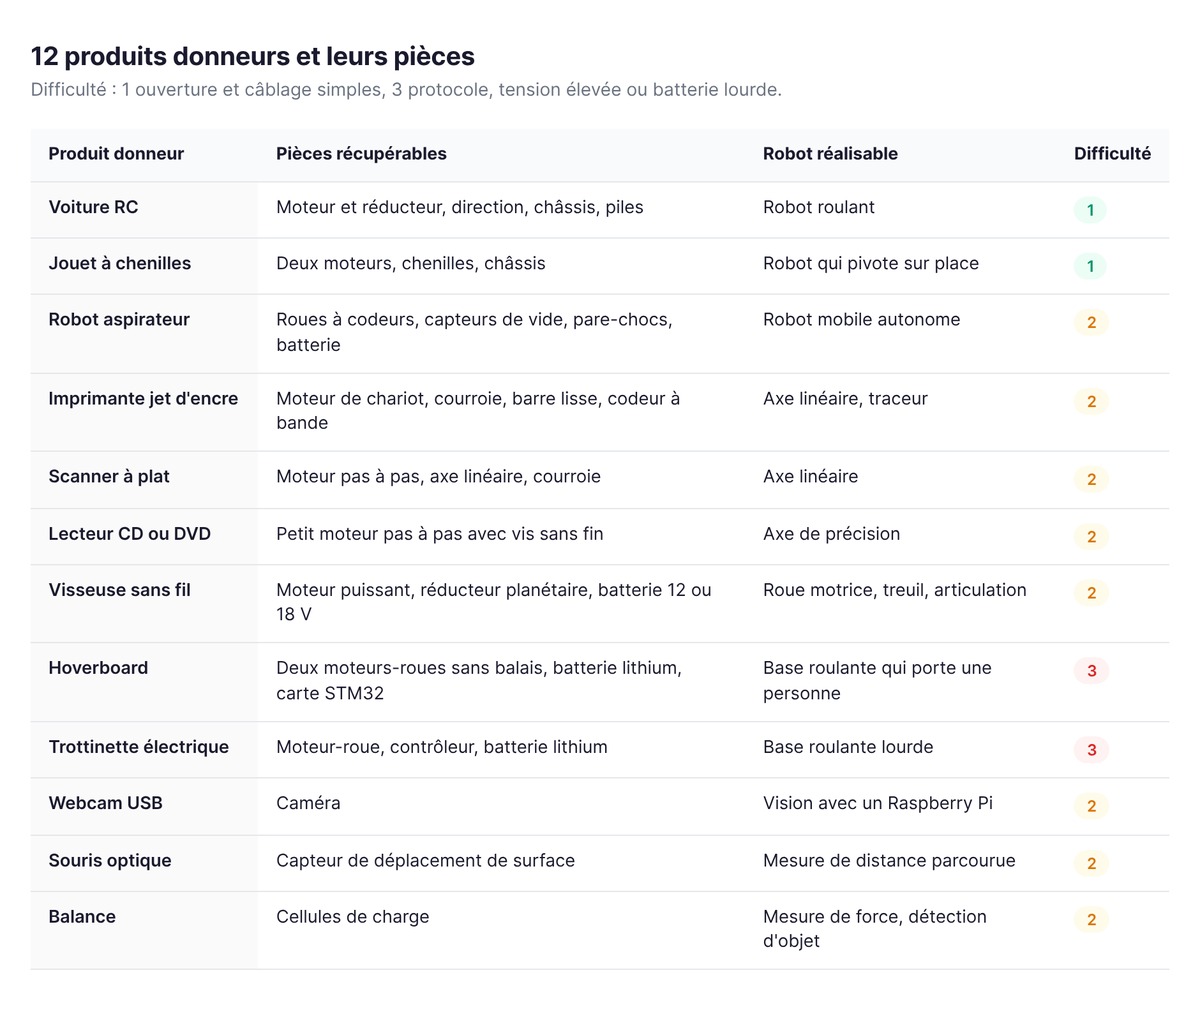
Every device in the table supplies at least one of the four blocks, and some supply three. Difficulty ranges from 1 (easy to open and wire) to 3 (a protocol to figure out, high voltage, heavy battery).
RC cars and remote-control toys
The RC car makes the best first donor. It usually contains a drive motor with its gearbox, a small motor or servo for steering, a battery box and a chassis. Tracked toys (tanks, excavators) are even simpler to control: one motor per track, and the robot spins in place when the two turn in opposite directions.
Robot vacuum
The robot vacuum is the richest donor: two motorized wheels with encoders, cliff sensors, a contact bumper, a battery. The next section covers it in detail.
Printer, scanner, CD/DVD drive
An inkjet printer contains a carriage motor, a belt, a smooth guide rod and often an optical strip encoder. A flatbed scanner supplies a stepper motor, a linear axis and a belt. A CD or DVD drive hides a small stepper motor with a lead screw that moves the laser head a few centimeters with precision. With these parts, you can build a linear axis, a plotter, or the first degree of freedom of an arm.
Cordless drill
A cordless drill packs a powerful motor, a high-torque planetary gearbox and a 12 V or 18 V battery depending on the model. It can drive the wheel of a heavy robot, a winch or an arm joint, with a beefier driver than the TB6612FNG.
Hoverboard and electric scooter
A hoverboard contains two brushless hub motors, a lithium battery and a power board. The open source project hoverboard-firmware-hack-FOC by EFeru, with 1.8k stars on GitHub, reflashes that board (an STM32F103RCT6 or its GD32 equivalent) with field-oriented control; its author recommends voltage and speed modes for robotics. One variant accepts serial commands sent from an Arduino. The result is a drive base that can carry a person, controlled with a few bytes. An electric scooter supplies a hub motor, a controller and a battery of the same kind.
Webcam, optical mouse, scale
A USB webcam plugged into a Raspberry Pi gives the robot vision. An optical mouse contains a sensor that measures how the surface beneath it moves, one way to measure distance traveled without wheel encoders. A kitchen or bathroom scale supplies load cells, which a small amplifier connects to the microcontroller to measure force or detect an object placed on it.
The robot vacuum, a hidden robotics kit
A robot vacuum is already a complete mobile robot: its manufacturer designed it to drive on its own, avoid falls and return to its dock, which is exactly the program of a first autonomous robot.
Salvageable parts: encoder wheels, cliff sensors, bumper, battery
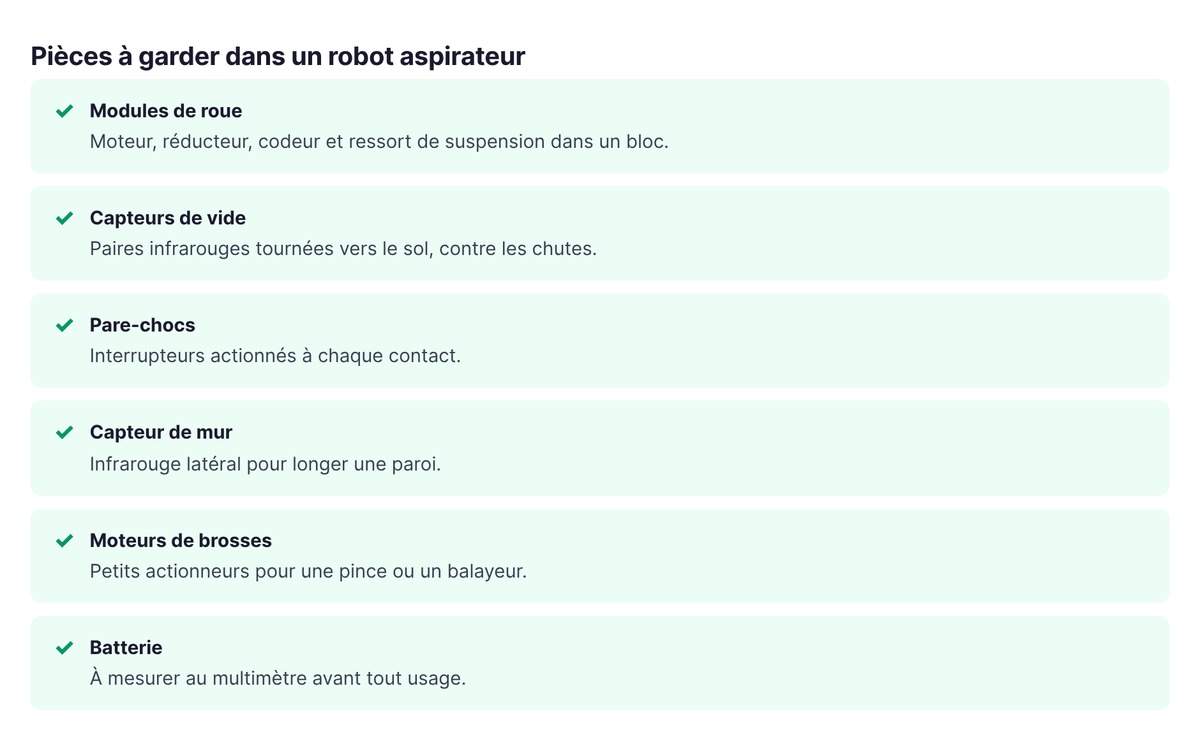
The wheel modules are the centerpiece: motor, gearbox, encoder and suspension spring all fit in a single unit. The cliff sensors, infrared emitter-receiver pairs pointed at the floor, detect the edge of a staircase. The bumper triggers switches on every contact. The brush motors can become the actuators for a gripper or a sweeper.
Roomba 500/600 series: control via the serial port (iRobot Open Interface)
iRobot publishes the Open Interface for its Roomba 500 and 600 series, also covered in iRobot's Create 2 documentation: a 7-pin Mini-DIN connector, hidden under the decorative top cover, communicates over 0 to 5 V TTL serial at 115,200 baud by default, or 19,200 baud via the baud rate change pin. The same connector gives direct, unregulated access to the robot's battery.
The protocol is just bytes. Command 128 starts the interface, 131 switches to Safe mode (the robot keeps its fall protection), 132 to Full mode (you get complete control), and 137 drives the wheels with a speed and a turning radius. In return, the robot sends on request the state of the bumpers and wheels, the four cliff sensors, and the left and right encoder counts.
The ESP32 runs at 3.3 V, so put a logic level shifter between its pins and the Roomba's port. With this setup, a secondhand Roomba becomes a mobile base you can drive over Wi-Fi, without a single solder joint.
Replacing the board with an ESP32
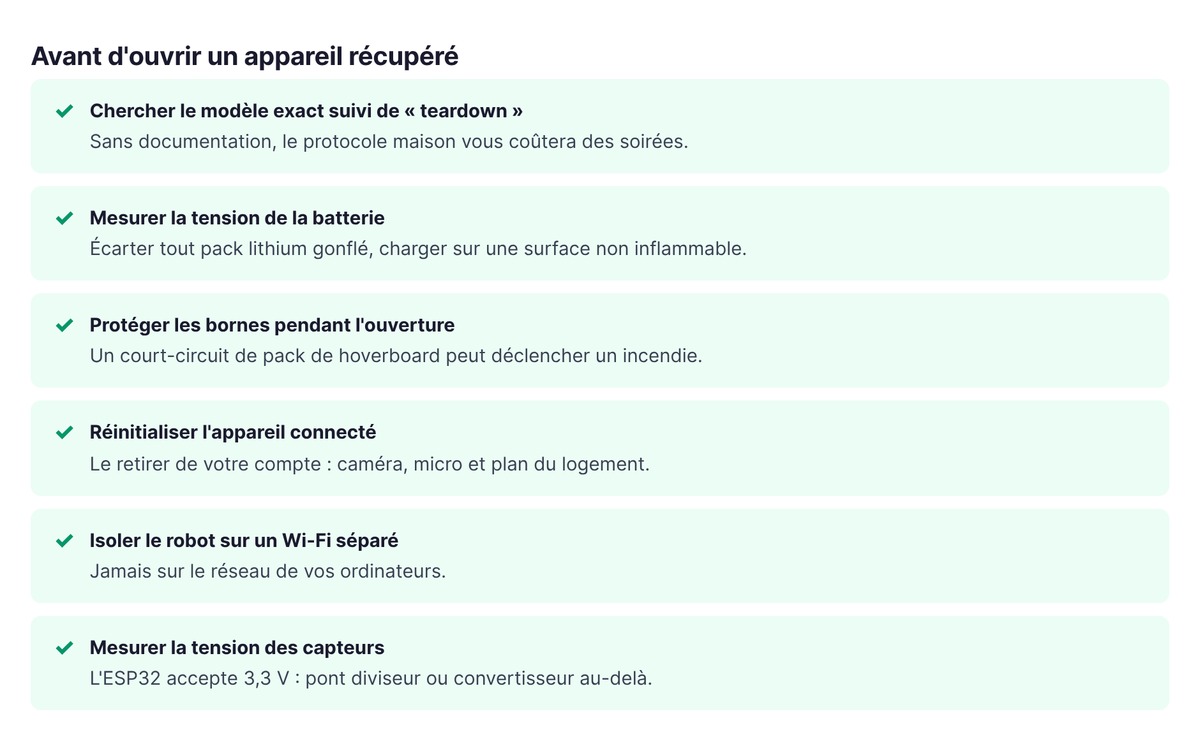
Other brands don't publish a protocol. You keep the mechanics and swap the board: wheel motors go to the driver, while encoders, cliff sensors and bumper contacts go to the ESP32 pins, after you check their voltage with a multimeter.
Recent lidar robots offer a third option. The free software Valetudo replaces the manufacturer's cloud and runs the vacuum locally. As of September 18, 2026, its list includes 48 models from 10 brands, including 16 Dreame and 9 Roborock units, rooted thanks to vulnerabilities found by researcher Dennis Giese. On many Dreame models, a 3.3 V USB serial adapter and a small interface board are enough, without breaking the warranty seals.
What extra hardware to buy
Salvage covers the mechanics. Three purchases remain: a microcontroller, a motor driver and two tools.
Microcontroller: Arduino or ESP32
The Arduino Uno runs at 5 V, like most hobby sensors and the Roomba's port, and documentation for it is abundant. The ESP32 adds Wi-Fi and Bluetooth, with 3.3 V logic. For a robot you control from a phone, go with the ESP32. Gotronic also sells the uPesy EDU ESP32 board in the Uno form factor, developed and made in France by uPesy and Vittascience, for €29.90 incl. VAT as of September 18, 2026.
Motor driver
The TB6612FNG drives two DC motors, with 1.2 A continuous and 3.2 A peak per channel, up to 15 V on the motor side according to the Toshiba datasheet. It handles toy and robot vacuum motors. For a drill motor, choose a driver rated for several tens of amps peak.
Tools: soldering iron, multimeter
Buy the multimeter first: it checks a motor, measures the voltage of an unknown battery, and identifies a sensor's wires. The soldering iron lets you extend motor leads, which are often too short or soldered to the original board. Add a breadboard, Dupont wires and precision screwdrivers with Torx bits, which are common on consumer devices.
First project step by step: a wheeled robot from an RC car
This project turns an RC car into a robot that drives forward, turns and stops on its own in front of an obstacle. Plan for a weekend.
Open the car and test the motors
Remove the body, photograph the original board and its wiring, then desolder or cut the wires of both motors flush with the board. Connect each motor to a battery: it should spin, then spin the other way when you swap the wires. If the steering uses a three-wire servo instead of a motor, keep it intact: the ESP32 can drive it directly.
Wire the driver and the ESP32
Connect the drive motor to the TB6612FNG's A outputs and the steering motor to the B outputs. The driver takes two power inputs: VM for the motors (the car's battery box) and VCC at 3.3 V from the ESP32. Tie all the grounds together. On the control side, six ESP32 pins go to AIN1, AIN2, PWMA, BIN1, BIN2 and PWMB, and a seventh goes to STBY, which enables the driver.
First code: drive, turn, stop
The following program, written for the Arduino IDE with ESP32 support, drives the car forward for two seconds, steers the wheels (left or right depending on your wiring), then stops. Adjust the pin numbers to match your wiring.
const int AIN1 = 25, AIN2 = 26, PWMA = 27;   // propulsion
const int BIN1 = 32, BIN2 = 33, PWMB = 14;   // direction
const int STBY = 13;

void moteur(int in1, int in2, int pwm, int vitesse) {
  digitalWrite(in1, vitesse > 0);
  digitalWrite(in2, vitesse < 0);
  analogWrite(pwm, abs(vitesse));             // 0 à 255
}

void setup() {
  int broches[] = {AIN1, AIN2, PWMA, BIN1, BIN2, PWMB, STBY};
  for (int b : broches) pinMode(b, OUTPUT);
  digitalWrite(STBY, HIGH);
}

void loop() {
  moteur(AIN1, AIN2, PWMA, 180);  delay(2000);   // avancer
  moteur(BIN1, BIN2, PWMB, 255);  delay(1000);   // braquer à gauche
  moteur(AIN1, AIN2, PWMA, 0);
  moteur(BIN1, BIN2, PWMB, 0);    delay(3000);   // s'arrêter
}
If the car backs up instead of moving forward, swap the two motor wires on the driver.
Add an obstacle sensor
An HC-SR04 ultrasonic sensor measures the distance in front of the robot. It runs at 5 V: its Echo pin returns a 5 V pulse, which a two-resistor voltage divider (1 kΩ and 2 kΩ) brings down to 3.3 V before it reaches the ESP32. In the loop, send a 10-microsecond pulse on Trig, measure the return duration with pulseIn, divide by 58 to get centimeters, and cut the drive motor below 20 cm.
The pitfalls of salvaging
Salvaging saves you the mechanics but costs you time on three fronts.
Proprietary protocols
Many recent devices have their boards talk over an in-house protocol: motors with integrated electronics, sensors paired to the original board, batteries with authentication. Before buying, search for the exact model followed by the word "teardown". If nobody has documented the internals, you will spend your evenings on a logic analyzer.
Lithium batteries in unknown condition
A secondhand lithium battery may have swollen, been fully drained, or carry a dead cell, and a hoverboard or scooter pack stores enough energy to start a fire. Measure its voltage, discard any swollen pack, charge it with its original charger on a non-flammable surface, and cover its terminals while you open the device. For a first robot, a box of rechargeable AA batteries is enough.
Connected devices and security (DJI Romo, February 2026)
A recent robot vacuum often carries a camera, a microphone and a map of your home. In February 2026, Le Figaro, citing AFP, reported that a 32-year-old French programmer, Sammy Azdoufal, wanted to control his DJI Romo with a PlayStation controller. By analyzing the traffic between the app and the robot, he gained access to data from 7,000 vacuums: camera, microphone, room maps. DJI says it fixed the flaw with two updates in early February. Two rules follow: reset any connected device you salvage and remove it from your account, and keep your robot on a Wi-Fi network separate from the one your computers use.
From tinkering to a hardware startup prototype
The building blocks in this guide are the same ones used in robotics products: a mobile base, actuators, sensors, onboard compute, a control loop. Physical AI adds a model that perceives and decides, and a growing share of that compute runs on the device itself, which is the subject of edge AI. The French startups building humanoid robots started with these same questions about motors, batteries and sensors.
For a founder, a donor product also makes a low-cost prototype. A reprogrammed robot vacuum is enough to test an indoor delivery service or shelf inventory before you design a single chassis. You show your first customers a demo that actually drives, and you learn what your machine needs to do before paying a manufacturer to build it.
FAQ
How do you build a robot as a beginner?
Start with an RC car or a tracked toy, replace its board with an ESP32 or an Arduino connected to a TB6612FNG motor driver, then program the machine to drive forward, turn and stop. Next, add an ultrasonic sensor to avoid obstacles. The salvaged chassis and motors spare you the mechanical work.
What materials do you need to build a robot?
A robot needs a structure, actuators (motors, servos), sensors, and a controller with its power supply. A salvaged device provides the first three. You need to buy a microcontroller, a motor driver, wires and a battery, plus a multimeter and a soldering iron.
How do you build a robot with AI?
Add a camera and a computer capable of running a vision model, such as a Raspberry Pi with a salvaged USB webcam. The Raspberry Pi recognizes objects or follows a line, then sends commands to the ESP32, which drives the motors. Physical AI works on the same principle, at a much larger scale.
How do you build a remote-controlled robot?
Set up the ESP32 as a Wi-Fi access point and serve a web page with four buttons (forward, back, left, right) that call the motor functions. You drive the robot from your phone's browser, with no app to install.
How much does a first homemade robot cost?
On September 18, 2026, Gotronic sells a NodeMCU ESP32 board for €13.90 incl. VAT and a TB6612FNG driver for €6.60 incl. VAT, for a total of €20.50 for the core electronics. The donor product costs whatever a broken device goes for, sometimes nothing if one is sitting in a closet. The multimeter and soldering iron then serve for all your future projects.