A Claude Code hook is a shell command that runs automatically at a specific point in a session: before a tool runs, after a file edit, at startup, or when Claude is waiting on you. Skills and subagents are smart collaborators, but they can still slip up. A hook is a mechanical guarantee: it fires every single time, with no judgment calls and nothing forgotten. You configure hooks in a settings.json file by pairing an event (like PreToolUse or PostToolUse) with a filter and a script. That lets you block a dangerous command before it runs, format your code after every edit, or get a notification when Claude needs you. This guide covers what a hook is, the types that matter, how to configure them, five hooks ready to copy, and how to use them as guardrails when you can't afford to break prod.
What is a Claude Code hook?
A hook is an automatic trigger. You tell Claude Code "when this event happens, run this script," and it does, every time, with no say from Claude. That's the fundamental difference from the rest of the ecosystem: skills and subagents depend on the model's judgment, while a hook is deterministic. It doesn't decide whether to act. It just acts.
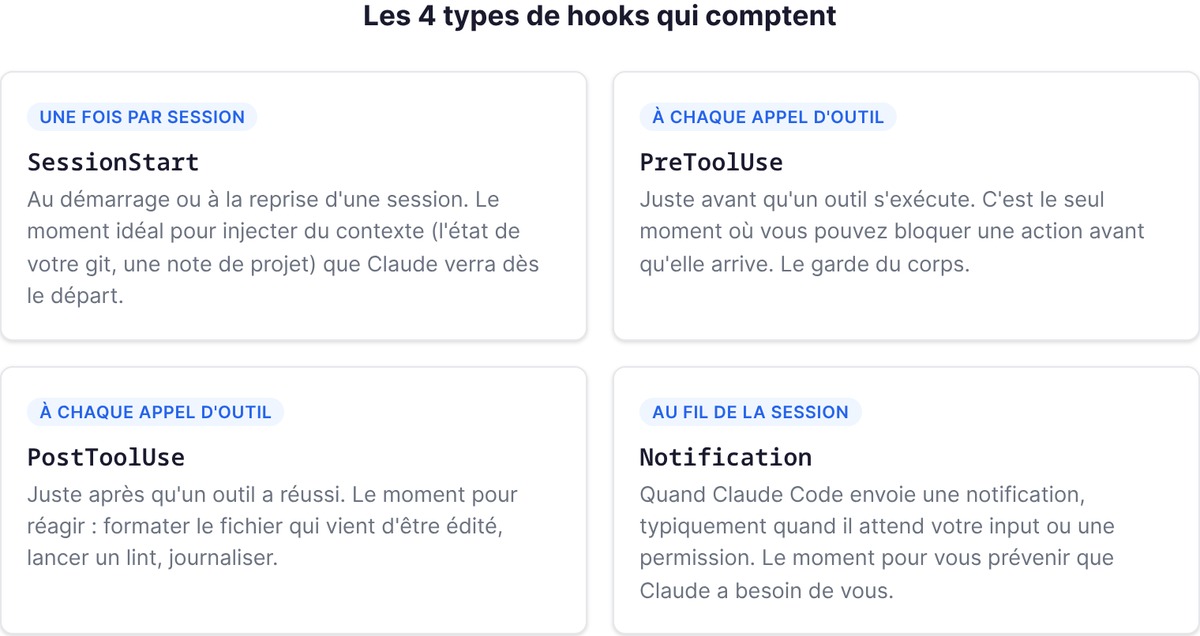
Technically, a hook is a shell command (Claude Code also accepts HTTP endpoints or LLM prompts, but shell commands are the common case and the one we cover here) that runs at a specific point in the session lifecycle. When the event fires and your filter matches, Claude Code sends the script a JSON object describing what's happening, on standard input. Your script inspects that data, acts on it, and can return a decision: allow or block.
In practice, the loop is always the same. An event happens. Claude Code checks whether a hook is attached to it and whether its filter matches. If so, it launches your script and passes it a JSON payload on standard input with the context: the session ID, the name of the tool involved, its arguments (for example the shell command or the path of the edited file), and the working directory. Your script reads that JSON, pulls out what it needs, does its job, then reports back through two channels: its exit code and what it writes to standard output. That pair (exit code + output) tells Claude Code whether to continue, block, or ignore. The whole system comes down to this mechanism, and once you have it in your head, writing a hook becomes trivial.
For a founder, hooks are the only Claude Code mechanism that gives you guarantees instead of probabilities. You can politely ask Claude, via a CLAUDE.md, to "never delete files without confirmation." It will comply most of the time. "Most of the time" is not a security policy. A hook blocks the action every time. When you code alone, one bad command can wipe a database or push a secret.
Hooks serve two broad purposes: automating (formatting, linting, logging, notifying, without thinking about it) and securing (blocking dangerous commands, preventing edits to sensitive files). Both rely on the same mechanism. The first saves you time on the repetitive tasks you forget to do; the second protects you from mistakes you didn't see coming. A solo founder needs both: nobody else is going to format your code for you, and nobody else is going to catch the bad command before it runs.
Hook types: PreToolUse, PostToolUse, Notification, SessionStart
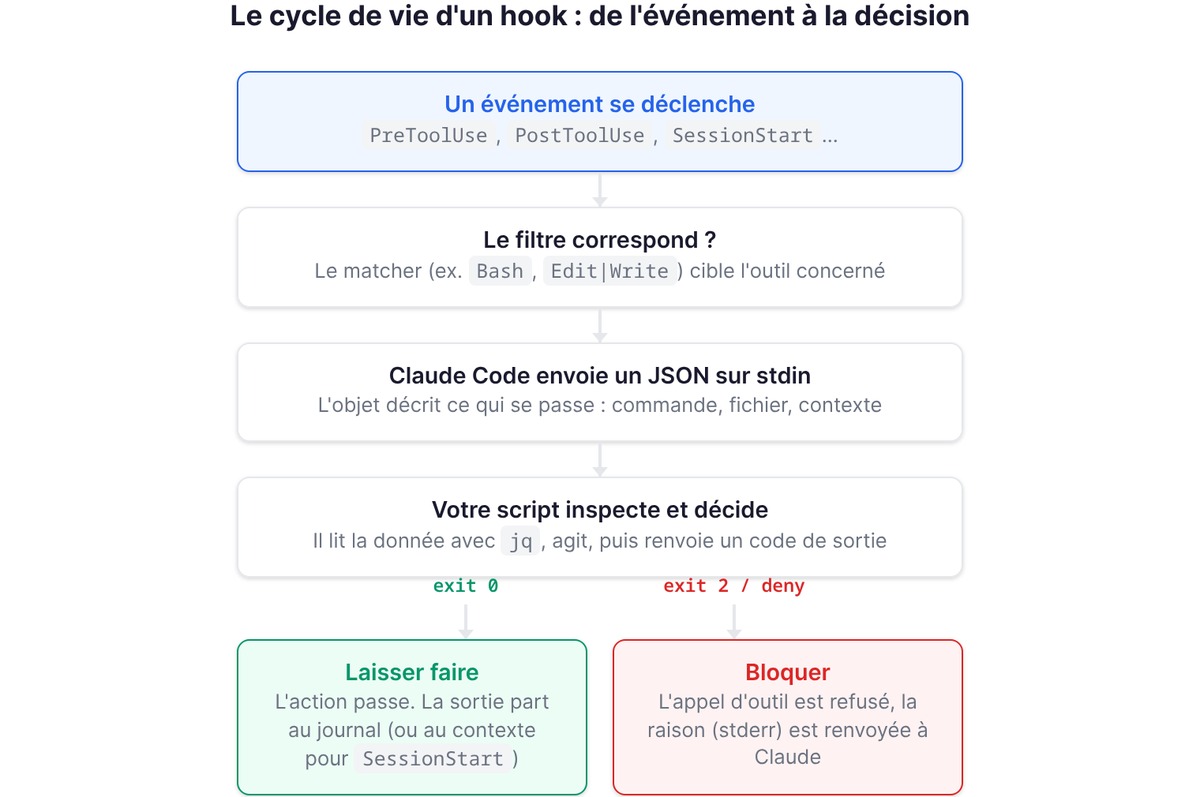
Claude Code fires hooks at many points, but four events cover most of what you need. You can group them by how often they run.
Once per session:
- SessionStart: when a session starts or resumes. The ideal moment to inject context (your git state, a project note) that Claude will see from the start.
On every tool call, inside Claude's work loop:
- PreToolUse: right before a tool runs. This is the only moment you can block an action before it happens.
- PostToolUse: right after a tool succeeds. The moment to react: format the file that was just edited, run a linter, write a log entry.
Throughout the session:
- Notification: when Claude Code sends a notification, typically when it's waiting for your input or a permission. The moment to alert you (a sound, a message) that Claude needs you.
These four are enough in most cases. But the full list is much longer, and a few other events are worth knowing right away because they unlock clever uses:
- UserPromptSubmit: when you submit a prompt, before Claude processes it. Its output is added to the context, so this is where you inject fresh information on every turn, or block a prompt that breaks a rule.
- Stop: when Claude finishes its response. The perfect moment to run your test suite or a final check automatically, as soon as Claude is done coding.
- SubagentStop: when a subagent finishes its work. Useful for reacting to the result of a delegated task.
- PreCompact: right before Claude Code compacts the context (when the conversation gets too long). Use it to save state before context gets summarized.
- SessionEnd: when the session closes. For cleanup, archiving a log, or shutting down cleanly.
There are others still (permissions, MCP tool notifications, directory changes), but you'll discover them as you need them. Start with the top four, then add Stop and UserPromptSubmit when you want to automate your tests and your context. That's already a very complete setup.
Configuring a hook in settings.json (minimal structure)
Hooks are configured in JSON, in a settings.json file. There are three locations, depending on the scope you want:
| File | Scope | Shared |
|---|---|---|
~/.claude/settings.json |
All your projects | No, local to your machine |
.claude/settings.json |
This project | Yes, can be committed to the repo |
.claude/settings.local.json |
This project | No, gitignored |
For a team guardrail (blocking dangerous commands on this repo), use .claude/settings.json and commit it so everyone benefits. For a personal setting (a notification when Claude is waiting on you), use ~/.claude/settings.json.
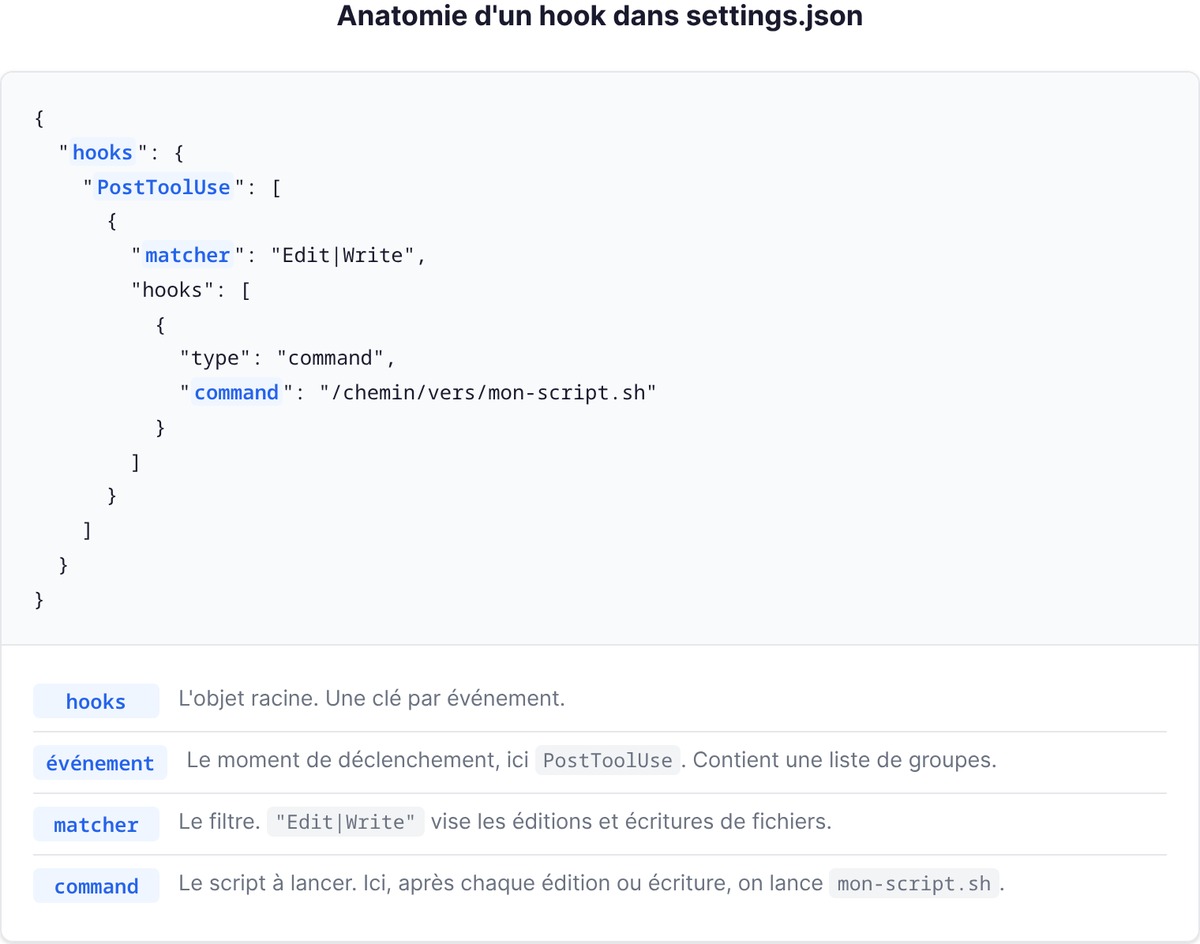
The structure never changes. A hooks object, one key per event, and for each event a list of groups. Each group has a matcher (the filter) and a list of hooks (the scripts to run). The minimal skeleton:
{
  "hooks": {
    "PostToolUse": [
      {
        "matcher": "Edit|Write",
        "hooks": [
          {
            "type": "command",
            "command": "/chemin/vers/mon-script.sh"
          }
        ]
      }
    ]
  }
}
This hook says: after every file edit or write (Edit|Write), run mon-script.sh. To go further, you need to understand three things: the matcher, the if field, and exit codes.
Before that, one question always comes up: what exactly does my script receive? A JSON payload on standard input. For a tool event, it looks like this:
{
  "session_id": "abc123",
  "tool_name": "Bash",
  "tool_input": { "command": "rm -rf /tmp/build" },
  "cwd": "/home/vous/projet"
}
Your script picks out what it needs with jq. To get the shell command: jq -r '.tool_input.command'. For the path of an edited file: jq -r '.tool_input.file_path'. That's all you need to know to read an event's context, and it's what every script below does. The exact field names vary by event (a SessionStart doesn't receive the same data as a PreToolUse), but the principle stays the same: JSON on stdin, which you read with jq.
Matchers: fine-grained filtering
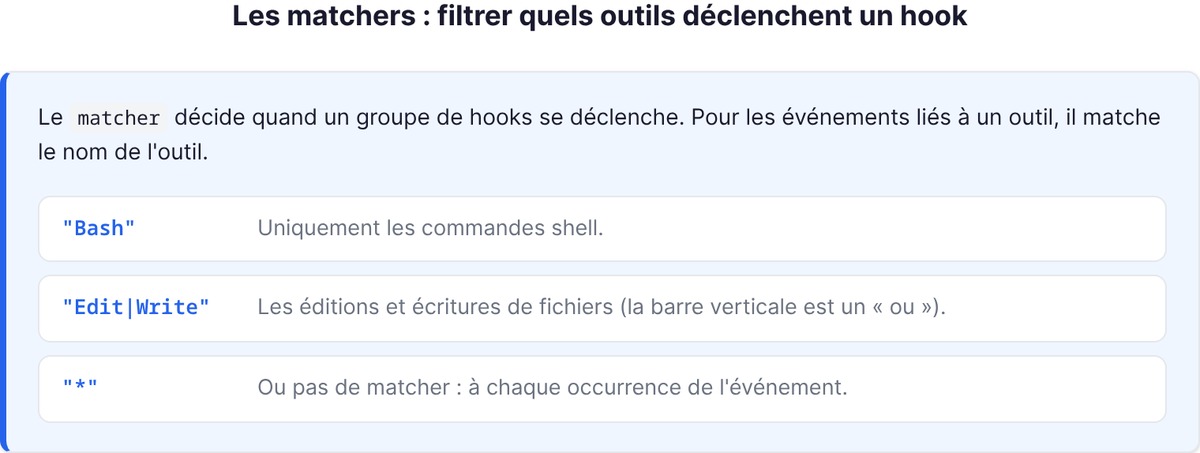
The matcher decides when a group of hooks fires. For tool-related events, it matches the tool name:
"Bash": shell commands only."Edit|Write": file edits and writes (the pipe means "or")."*"or no matcher: every occurrence of the event.
Some events (like UserPromptSubmit or Stop) don't take a matcher: they always fire. A matcher added there is simply ignored.
For even finer filtering, there's the if field, which looks at the tool's arguments as well as the tool itself, using permission rule syntax. "Bash(rm *)" only fires if the shell command is an rm. "Edit(*.ts)" only reacts to TypeScript files. This keeps you from running a script on every command when you only care about one specific case, and it saves the cost of spawning a process for nothing.
The exit codes you need to know
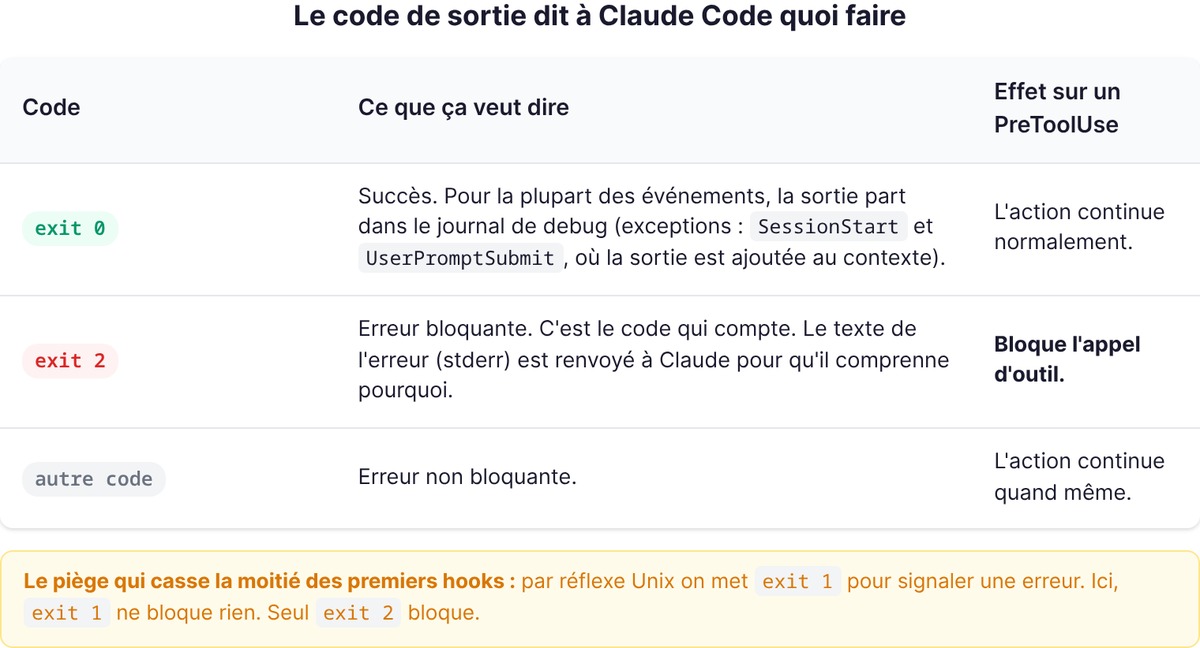
This is the part people get wrong most often, and it's the heart of the system. Your script's exit code tells Claude Code what to do:
- Exit 0: success. For most events, whatever your script writes goes to the debug log (the useful exceptions are
SessionStartandUserPromptSubmit, where the output is added to the context Claude sees). - Exit 2: blocking error. This is the code that matters. On a
PreToolUse, it blocks the tool call, and the error text (stderr) is sent back to Claude so it understands why. - Any other code: non-blocking error. The action goes ahead anyway.
Remember this trap, because it breaks a lot of first hooks: exit 1 blocks nothing. Out of Unix habit, people use exit 1 to signal an error. Here, only exit 2 blocks. If your hook is supposed to enforce a rule, use exit 2, or Claude will go right past it.
For finer control than a simple "block / allow," you can write structured JSON to standard output on an exit 0. That's what the block-rm hook below does: instead of relying on the exit code, it returns an object with a permissionDecision. This field accepts three values that cover every case: "deny" refuses the action and gives Claude the reason, "allow" permits it without asking for permission again, and "ask" forces the usual permission prompt. This JSON is more expressive than exit codes because it lets you make the call and also explain why, in a message Claude reads and understands. For a PreToolUse, remember the rule: exit code 2 is the quick way to block, and the permissionDecision JSON is the clean way to block with a reason.
5 hooks ready to copy
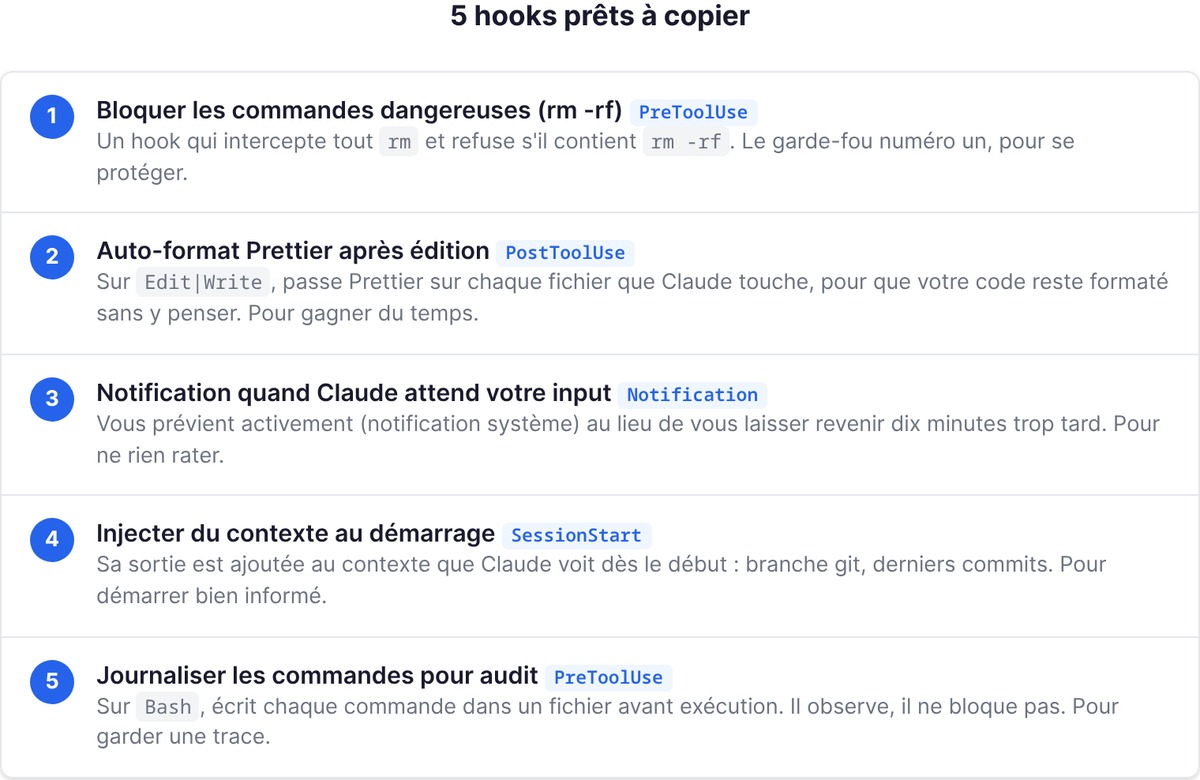
Here are five concrete hooks, each built on Claude Code's actual mechanism. Copy the JSON into your settings.json, put the script in .claude/hooks/ (remember to make it executable with chmod +x), adjust the path, and you're running. Each one covers a real founder-developer need: one to protect yourself, one to save time, one so you never miss a prompt, one to start every session informed, and one to keep a record.
Block dangerous commands (rm -rf)
The number one guardrail. A PreToolUse hook that intercepts every rm and refuses it if it contains rm -rf. The config, in .claude/settings.json:
{
  "hooks": {
    "PreToolUse": [
      {
        "matcher": "Bash",
        "hooks": [
          {
            "type": "command",
            "if": "Bash(rm *)",
            "command": "${CLAUDE_PROJECT_DIR}/.claude/hooks/block-rm.sh"
          }
        ]
      }
    ]
  }
}
The block-rm.sh script reads the command from standard input and refuses it if it's destructive:
#!/bin/bash
COMMAND=$(jq -r '.tool_input.command')

if echo "$COMMAND" | grep -q 'rm -rf'; then
  jq -n '{
    hookSpecificOutput: {
      hookEventName: "PreToolUse",
      permissionDecision: "deny",
      permissionDecisionReason: "Commande destructrice bloquée par un hook"
    }
  }'
else
  exit 0
fi
When Claude tries an rm -rf, the hook returns a deny decision, the call is blocked, and Claude sees the reason. When it's a harmless rm fichier.txt, the script runs exit 0 and lets the normal permission flow apply. Note the important nuance: the hook can refuse, but staying silent doesn't mean approval. It either blocks or stays quiet. It never approves anything on your behalf.
Auto-format with Prettier after edits
The hook that saves you time every day. A PostToolUse on Edit|Write that runs Prettier on every file Claude touches, so your code stays formatted without you thinking about it:
{
  "hooks": {
    "PostToolUse": [
      {
        "matcher": "Edit|Write",
        "hooks": [
          {
            "type": "command",
            "command": "${CLAUDE_PROJECT_DIR}/.claude/hooks/format.sh"
          }
        ]
      }
    ]
  }
}
The script gets the edited file's path from the JSON and formats it:
#!/bin/bash
FILE=$(jq -r '.tool_input.file_path')

if [ -n "$FILE" ] && [ -f "$FILE" ]; then
  npx prettier --write "$FILE"
fi
exit 0
No more "oops, I forgot to format." The hook handles it on every edit, without exception. The same structure works for anything that should run after an edit: swap prettier for eslint --fix to lint, for black if you're in Python, or chain several commands. The key is the Edit|Write matcher, which targets exactly the moment a file has changed.
Get notified when Claude needs your input
You start Claude on a long task, go do something else, and come back ten minutes too late because it's been waiting for a permission the whole time. A Notification hook fixes that by actively alerting you:
{
  "hooks": {
    "Notification": [
      {
        "hooks": [
          {
            "type": "command",
            "command": "osascript -e 'display notification \"Claude a besoin de vous\" with title \"Claude Code\"'"
          }
        ]
      }
    ]
  }
}
On macOS, this triggers a system notification. On Linux, use notify-send "Claude Code" "Claude a besoin de vous" instead. You stop watching the terminal, and it calls you when it needs you. On long tasks, you kick things off, move on to something else, and come back right when you're needed, instead of checking back over and over to see whether it's finished or stuck.
Inject context at startup
A SessionStart hook whose output is added to the context Claude sees from the very beginning. Handy for giving it the project's state without typing it every time:
{
  "hooks": {
    "SessionStart": [
      {
        "hooks": [
          {
            "type": "command",
            "command": "echo \"Branche: $(git branch --show-current) | Derniers commits: $(git log --oneline -3)\""
          }
        ]
      }
    ]
  }
}
Every session, Claude starts out knowing which branch you're on and what's been done recently. This is one of the few events (along with UserPromptSubmit) where the hook's output feeds Claude's context instead of just the debug log. You can take it further: inject open tickets, the list of tasks in progress, your staging URL, a convention you want to reinforce. Anything you retype at the start of every session is a good candidate. Keep it concise, though: this context takes up space, so include only what matters.
Log commands for auditing
The fifth one is low-key but valuable when you want a record. A PreToolUse on Bash that writes every command to a file before it runs:
{
  "hooks": {
    "PreToolUse": [
      {
        "matcher": "Bash",
        "hooks": [
          {
            "type": "command",
            "command": "jq -r '.tool_input.command' >> ~/.claude/bash-audit.log"
          }
        ]
      }
    ]
  }
}
You keep a log of everything Claude ran in your shell. The day something goes off the rails, you know exactly what happened. And since the script never returns exit 2, it never interferes with execution: it observes without blocking. For a more useful log, add a timestamp to each line, for example by prefixing the date: echo "$(date -Iseconds) $(jq -r '.tool_input.command')" >> ~/.claude/bash-audit.log. You get a complete chronological record, invaluable for a post-mortem or simply for understanding how Claude solved a task.
Hooks as production guardrails (the founder angle)
When you let an AI agent act on your machine, the question that matters is "what happens the day things go wrong?" A hook turns a rule you hope gets followed into a rule that's enforced.
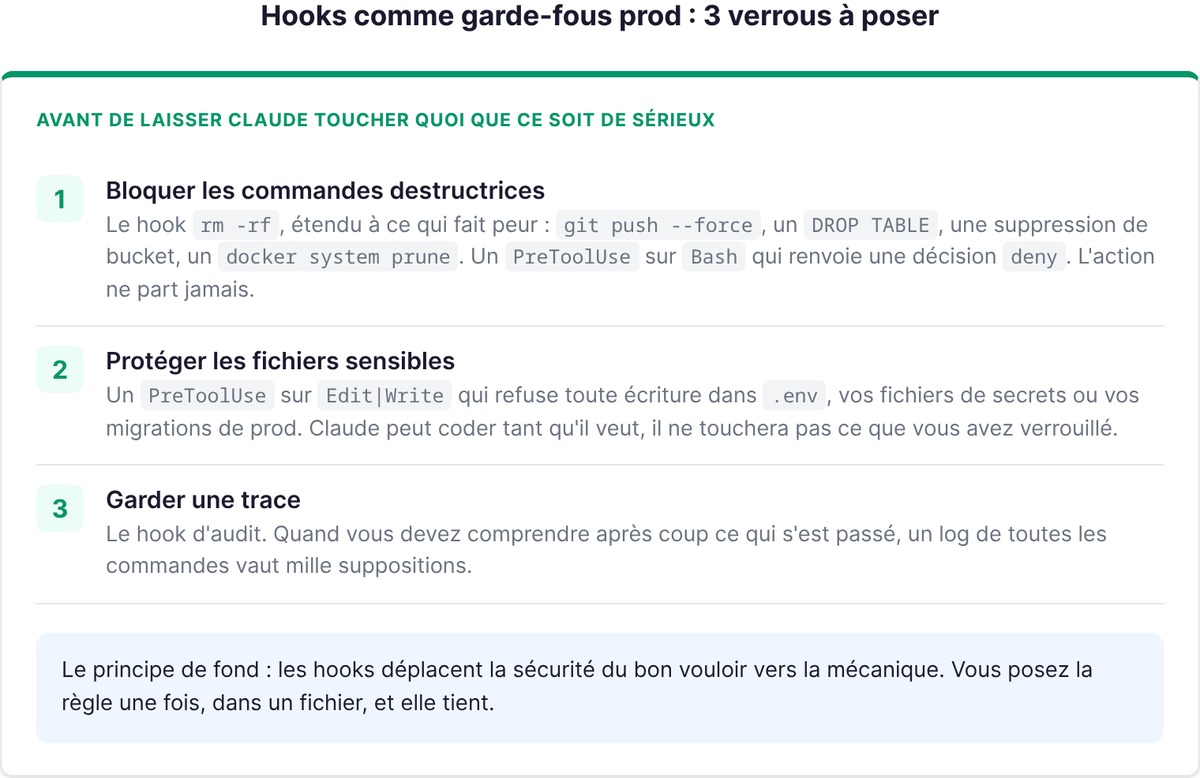
Here are three guardrails to set up before you let Claude touch anything serious.
Block destructive commands. The rm -rf hook above, extended to whatever scares you: git push --force overwriting remote history, a DROP TABLE on your database, a bucket deletion, a docker system prune. The logic stays the same: a PreToolUse on Bash, and in the script a grep for forbidden patterns that returns a deny decision. You can group everything into a single "blocklist" hook that refuses a handful of commands you never want to see run under any circumstances. The action never goes through, and you didn't have to watch.
Protect sensitive files. A PreToolUse on Edit|Write that refuses any write to .env, your secrets files, or your production migrations. Claude can code all it wants, but it won't touch what you've locked down. The script is just a few lines:
#!/bin/bash
FILE=$(jq -r '.tool_input.file_path')

case "$FILE" in
  *.env|*/secrets/*|*/migrations/prod/*)
    jq -n '{
      hookSpecificOutput: {
        hookEventName: "PreToolUse",
        permissionDecision: "deny",
        permissionDecisionReason: "Fichier protégé: édition interdite par un hook"
      }
    }'
    ;;
  *)
    exit 0
    ;;
esac
Wired to a PreToolUse with an "Edit|Write" matcher, this hook makes your critical files untouchable by the agent while still letting you edit them yourself. It's the kind of lock you set once and forget, until the day it saves you from an overwritten secret or a production migration modified by mistake.
Keep a record. The audit hook. When you need to figure out after the fact what happened, a log of every command tells you exactly what ran.
The underlying principle, and what makes hooks such a good fit for a solo founder: security moves from the model's goodwill to a mechanism. You no longer have to trust the model to follow an instruction. You no longer have to review every command before it runs. You set the rule once, in a file, and it holds.
One last piece of practical advice, because a badly written hook can backfire. A PreToolUse hook runs before every matching tool call: if it's slow, it slows down your whole session. Keep your scripts fast and targeted, use the if field so they only fire on the cases that matter, and test them on their own before wiring them in (a hook that crashes with an accidental exit 2 will block Claude for no reason). Start with blocking destructive commands, confirm it does its job, then add the others one at a time. One guardrail you understand is worth more than ten you copied without testing.
Further reading
FAQ
What is a hook in Claude Code?
A hook is a shell command that runs automatically at a specific point in a Claude Code session: before a tool (PreToolUse), after it (PostToolUse), at startup (SessionStart), or on a notification. You configure it in a settings.json file. Unlike an instruction given to Claude, a hook is deterministic: it fires every time, without depending on the model's judgment.
What's the difference between PreToolUse and PostToolUse?
PreToolUse fires before a tool runs: it's the only moment you can block an action (by returning a deny decision or exit code 2). PostToolUse fires after a tool succeeds: it's the moment to react, for example by formatting the file that was just edited or running a linter. One prevents, the other cleans up.
How do I configure a hook in settings.json?
Add a hooks object to your settings.json, with one key per event. Each event contains a list of groups, each with a matcher (the filter, for example "Bash" or "Edit|Write") and a list of hooks of type command. Put the file in .claude/settings.json for a setting shared with your team, or in ~/.claude/settings.json for a personal one.
How do I block a dangerous command with a hook?
Use a PreToolUse hook with a "Bash" matcher and a targeted if field like "Bash(rm *)". The script reads the command from standard input and returns a permissionDecision: "deny" decision (or runs exit 2) if the command is dangerous. Claude Code then blocks the call and shows Claude the reason. Be careful: exit 1 doesn't block anything. Only exit 2 (or a deny decision) does.
What are hooks actually useful for as a founder?
Two things: automating (formatting, linting, logging, notifying without thinking about it) and securing (blocking destructive commands, protecting sensitive files). Their big advantage is the guarantee: an instruction in a CLAUDE.md is followed "most of the time," while a hook applies every single time. That's what lets you give an AI agent room to act without watching every command.
Do hooks slow down Claude Code?
They can, if you write them badly. A PreToolUse hook runs before every tool call that matches its matcher: if it's slow, it adds that delay to every action. The fix is simple: keep your scripts fast, use the if field so they only fire on the cases that matter, and avoid running a hook on "*" (all tools) when a specific matcher will do. A well-targeted hook is imperceptible.
Can hooks be used with MCP servers?
Yes. Tools exposed by your MCP servers show up as regular tools in events like PreToolUse and PostToolUse, in the form mcp__server__tool. So you can match them: mcp__github__.* targets every tool from the GitHub server, for example to log or validate each operation. One thing to watch: to match all of a server's tools, make sure to add .* after its name. Otherwise the matcher is compared as an exact string and matches nothing.